
Howto | Make a Linux USB Key
30 Apr 2010Despite all the fantastic tools around, making a Linux USB key seems to be inconsistent. Modern hardware seems to be fairly good, but older hardware may need fat 16 or fat 32 or superfloppy format. The eee pc 701 for example seemed to need superfloppy format to work.
The Shortcut
Try erasing the contents of your USB key, then skipping down to Install Unetbootin below. You could be lucky, and save yourself some fiddling about!
Step 1: Make sure that your USB key is unmounted
Open a terminal and type:
$ mount
This will list your current mounts, including your USB key (if mounted). Take a note of the mount point (e.g. /media/disk) and type:
$ sudo umount /media/disk
Once you are confident that the drive is not mounted, you may proceed.
Step 2: Determine the device
Find you USB key by typing:
$ sudo fdisk -l

Disk /dev/sdc: 64 MB, 64487424 bytes
4 heads, 32 sectors/track, 984 cylinders
Units = cylinders of 128 * 512 = 65536 bytes
Disk identifier: 0x5187ef1e

Device Boot      Start         End      Blocks   Id  System
/dev/sdc1   *           1         983       62896    6  FAT16
Step 3: Delete the old partitions
This will lose any data on this drive!!!
Ignore the number after the letter, so in the above example the device is /dev/sdc, not /dev/sdc1; the 1 is partition 1, but fdisk works on the whole drive, not just a single partition.
$ sudo fdisk /dev/sdX
Command (m for help):
- Type “p” and enter to view the existing partitions (generally only one)
- Type “d” and enter to delete the partition (if there are multiple partitions, you may need to enter 1 for the first)
- Type “p” to view the remaining partitions (there should not be any!)
At this point, nothing has really happened, you can “q” to quit and nothing will have been touched.
Step 4: Create the new partition
- Type “n” to make a new partition
- Type “p” to make this partition primary and press enter
- Type “1” (one) to make this the first partition and then press enter
- Press [enter] to accept the default first cylinder
- Press [enter] again to accept the default last cylinder
- Type “p” to view what you have done
This should display the current configuration of your drive:
Disk /dev/sdc: 64 MB, 64487424 bytes
4 heads, 32 sectors/track, 984 cylinders
Units = cylinders of 128 * 512 = 65536 bytes
Disk identifier: 0x5187ef1e

Device Boot      Start         End      Blocks   Id  System
/dev/sdc1               1         984       62960   83  Linux
Step 5: Change partition to W95 Fat32
- Type “t” to change type
- Type “b” for Win95 Fat32
- Type “p” to view what you have done
Step 6: Make partition bootable
- Type “a” to add bootable flag
- Type “1” (one) to select first partition
- Type “p” to view what you have done
Step 7: Write partition changes
Up to this point, nothing has actually been changed; if you are happy with the changes you have made, then:
- Type “w” to write the new partition information to the USB key
Step 8: Format the partition
The final step is to create the fat filesystem:
Note that this time we DO quote the partition number
$ sudo mkfs.vfat -F 32 /dev/sdx1
This process ends by sync’ing the disk.
Step 9: Mount the USB key
For most systems, this can be easily achieved by simply unplugging and replugging in the key, and taking option to Mount when prompted. Equally you can mount manually by typing:
Change “mountpoint” below for an appropriate name
$ sudo mkdir /mnt/mountpoint
$ sudo mount /dev/sdx1 /mnt/mountpoint
Step 9: Install Unetbootin
$ sudo aptitude install unetbootin
Step 10: Use Unetbootin
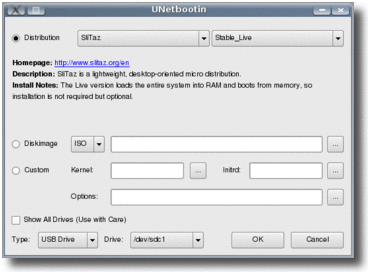
Run Unetbootin from your menu, either select a distribution and version, or take the option to install an already downloaded disk image.
Next select the usb drive.
Given the tiny size of my USB key, I am using slitaz, which is a minimal distribution.
Have a look at the contents of the USB drive, in at least one test, unetbootin had only copied a single file across. Just run unetbooting again if that happens.
Step 11: Reboot and Test
That’s it, you should now be able to reboot onto the drive.
Step 12: Troubleshooting
My first attempt was using FAT32, which did not work. Next I tried FAT16, which also did not work, then I tried EXT2, by change partition type to “83 Linux” and then typing the following command (replacing the “x” for your correct drive letter):
$ sudo mkfs.ext2 /dev/sdx1
This time the USB key was detected as USB-HDD and booted perfectly. It does seem that everyone’s has different experiences, and there is an element of trial and error to get things working.
If you have a usb key over 512mb and are using FAT32, then you might try reducing the size of the partition to 512k, and create a second partition with the remaining space.
See Alternative Methods for other options.
Step 13: Superfloppy
I understand that the problem with USB booting, is that many BIOS’s understand the superfloppy format - i.e. a formatted but unpartitioned drive. This is easy enough to create under Linux, simply delete the partitions in fdisk and format with:
# mkdosfs -I /dev/sdx
or possibly on older hardware:
# mkdosfs -v -F 16 -I /dev/sdx
The problem is that superfloppies will not be auto-mounted under Linux, with the result that Unetbootin cannot write to them. But you can mount superfloppies manually:
$ cd /media
$ sudo mkdir sdx
$ sudo mount /dev/sdx sdx
Then use unetbooting to write to /dev/sdx, and not forgetting to umount afterwards:
$ sudo sync
$ sudo umount sdx
Alternative Methods
Some distributions offer their own USB key creation software, including Ubuntu 8.10+, PuppyLinux 4.10+, and Slitaz, to name but a few.
Also, it is possible to obtain disk images that can be written to a usb key directly, thus circumventing these problems. For example: